Redecorating your home is the perfect time to think about improving its energy efficiency and comfort. One of the most effective and often overlooked upgrades is internal wall insulation. Whether you're a DIY enthusiast looking for your next weekend project or a professional tradesperson helping a client, insulating internal walls is a practical and achievable solution that not only improves thermal performance but also enhances acoustic comfort and reduces heating bills.
With energy efficiency being a top priority in UK households, adopting simple and cost-effective insulation solutions can have a significant impact. This guide provides a step-by-step explanation, accessible to homeowners and professionals alike, on how to add insulation to your internal walls without breaking the bank or needing specialised tools.
Why Insulate Internal Walls?
Many homes in the UK, especially older properties, were built without adequate insulation. While much attention is given to lofts, floors and external walls, internal wall insulation can also play a crucial role in overall energy performance. It works by reducing heat transfer between rooms or from communal living areas to unused spaces like garages or hallways, helping to retain warmth where it matters most.
Beyond improving thermal insulation, internal wall insulation can act as an effective soundproofing layer. If you live in a busy household, work from home, or reside in a flat with thin walls, you'll immediately notice the benefit of reduced noise pollution.
Moreover, for design-conscious homeowners, internal insulation can offer an opportunity to smooth the wall surface, improve paint adhesion or wallpaper application, and even conceal uneven patches or pipework behind a fresh layer of thermal boards.
Choosing the Right Insulation Material
There are several types of insulation material suitable for internal walls. Your choice will depend on your budget, wall condition, moisture levels, and whether you're retrofitting insulation or adding it in the course of a renovation. Here are the common types:
| Insulation Type | Material | Thermal Efficiency | Sound Insulation | DIY Friendly |
|---|---|---|---|---|
| Insulated Plasterboard | Gypsum + PIR Foam/Polystyrene | High | Moderate | Yes |
| Mineral Wool Batts | Rock Wool / Glass Wool | Moderate | High | Yes, with timber frame |
| Rigid Foam Boards | PIR or EPS | Very High | Low | Yes |
| Multi-Layer Foil Insulation | Reflective Aluminium + Wadding | Moderate – High | Low | Yes |
If energy performance is your top goal, opt for insulated plasterboard, which combines a layer of plasterboard with foam insulation to create a product that is easy to fix directly to the wall. For enhanced soundproofing – ideal for bedrooms or offices – mineral wool batts within a timber frame are your best option.
DIY Installation: Step-by-Step Guide
You don’t need to be a professional builder to insulate internal walls. With common tools, some patience, and careful preparation, it's possible to complete most insulation jobs over a weekend.
Step 1: Prepare the Wall
Start by removing any wallpaper, loose plaster or fittings. Use a spirit level to check for uneven surfaces. If there is any sign of dampness, this should be resolved before continuing – insulation will trap moisture which could cause mould problems.
Step 2: Measure and Cut
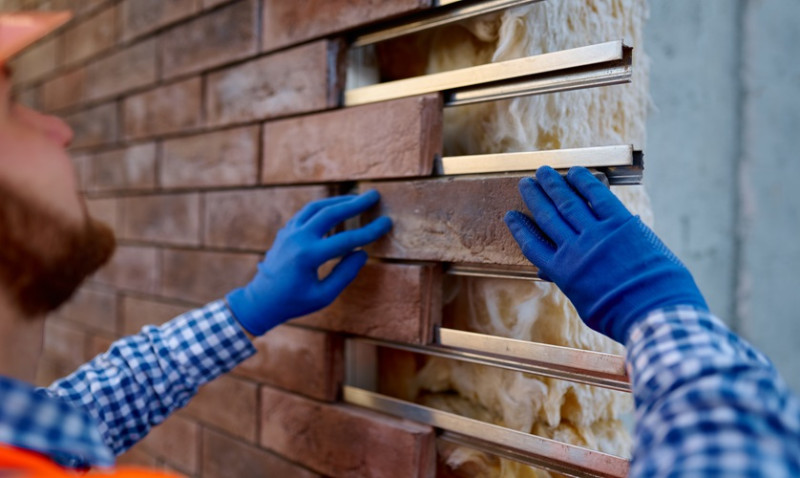
Measure the dimensions of your wall and cut the insulation boards or batts to size using a handsaw or insulation knife. Always wear gloves and a dust mask, especially when handling mineral wool.
Step 3: Fixing the Insulation
For insulated plasterboard, use adhesive dabs of drywall adhesive in a dot-and-dab method or secure with mechanical fixings directly into masonry. Foam boards can also be glued in place where appropriate. With batt insulation, first fix a timber or metal stud frame to hold the batts in place securely, then cover with plasterboard.
Step 4: Seal the Gaps
Use expanding foam or flexible sealant around the edges, especially around windows, sockets and between boards, to prevent unwanted thermal bridging or draughts. This detail is often overlooked but is essential for maximizing insulation performance.
Step 5: Finishing
Once sealed and fixed, skim the surface with plaster (if required), then sand and decorate as you would any other wall. That’s it—your room is now better insulated for both warmth and quiet!
Common Mistakes to Avoid
Even though insulating internal walls is a relatively simple DIY task, there are some common pitfalls to watch out for. One of the biggest mistakes is not addressing existing damp or ventilation issues prior to installation. Moisture trapped behind insulation can lead to condensation and black mould, which poses a serious health risk.
Another common mistake is neglecting to seal joints and gaps between boards or along the wall perimeter. Even the smallest gaps can allow cold air to pass through, reducing the effectiveness of the insulation by up to 30%.
Finally, overloading the walls with overly thick materials in tight indoor spaces can make rooms feel smaller and cramped. Select slim, high-performance materials when working in tight hallways or smaller bedrooms for a good balance between thermal performance and aesthetics.
How Much Does It Cost?
Cost is always an important factor in any home improvement decision. Fortunately, internal wall insulation is relatively affordable, especially when done DIY. A single wall using insulated plasterboard typically costs as little as £15–£25 per square metre (materials only). Tools like saws, adhesives, fixings and filler might add £50–£100 per project, depending on size.
Hiring a professional may mean paying an additional £200–£500 labour for a typical room, but the return on investment comes through lower energy bills and enhanced home comfort. For example, according to the Energy Saving Trust, insulating solid walls could save a semi-detached household between £160–£420 annually on heating bills.
When to Call a Professional
While DIY insulation is achievable, some scenarios demand a professional touch. If your home has structural issues, damp, or unusual wall shapes (like curved or vaulted features), a tradesperson or architect can advise on suitable solutions.
Likewise, for larger projects or whole-house retrofits, involving an installer ensures correct material selection, compliance with building regulations, and access to government schemes or grants.
In particular, listed buildings or properties in conservation areas may require permission or specialist materials to maintain heritage and character features. An architect familiar with local planning laws can guide you here.
Final Thoughts: A Smarter Way to Live
Insulating internal walls is more than just a way to slash your heating bills. It’s a comfort upgrade, an energy-saving move, and a sound investment in your property's value. With modern materials and user-friendly installation methods, this once-specialist task is now within reach for almost every competent DIYer in the UK.
So next time you’re giving your walls a fresh coat of paint or planning a home office makeover, consider what’s behind those walls too. With just a bit of effort, you can turn your home into a quieter, warmer and more efficient space—without ever opening a construction site.
Trending articles
- How to Get More Insulation And ... Feb 2026
- How Much Does Insulation And Cladding ... Feb 2026
- How to Find a Reliable Insulation ... Feb 2026
- Cladding Insulation Costs UK 2026: ... Feb 2026
-
 How To Insulate and Clad Your ...
Jul 2025
How To Insulate and Clad Your ...
Jul 2025
-
 How You Can DIY External Wall ...
Jul 2025
How You Can DIY External Wall ...
Jul 2025