Are you looking to improve the energy efficiency of your home, reduce your heating bills, and add a fresh new look to your property’s exterior? External Wall Insulation (EWI) is one of the most impactful ways to insulate a property, especially if you live in an older home with solid walls. The best part? You can DIY it with some effort, patience, and the right guidance.
This complete step-by-step guide will walk you through everything you need to know about installing external wall insulation by yourself. Whether you’re a DIY enthusiast, young homeowner refreshing your first property, or even a professional tradesperson exploring this avenue, this guide will help you do it right – the UK way.
What is External Wall Insulation (EWI)?
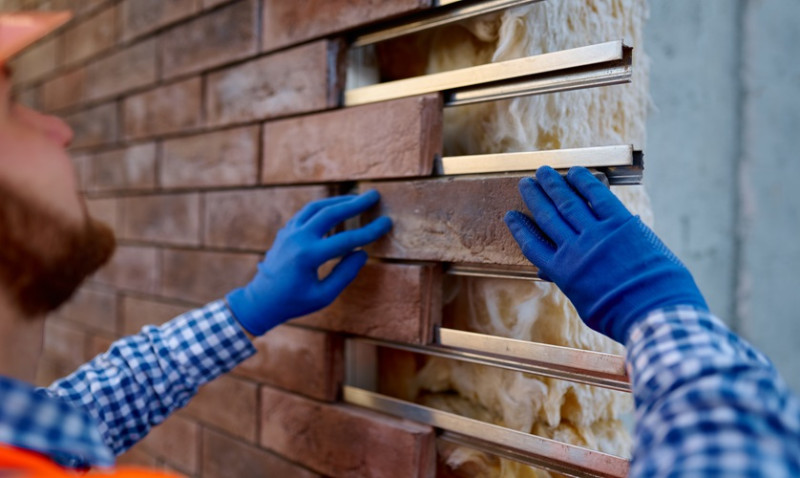
External Wall Insulation involves fixing insulation boards to the outside walls of your house, then finishing it with render or cladding. It dramatically improves your home's thermal efficiency, prevents dampness, and gives your façade a modern, smooth, or textured finish.
Unlike internal insulation, EWI doesn’t compromise your interior living space. It’s especially suited for solid-wall properties, which are common in the UK – particularly in pre-1920s homes. You can save up to £475 per year on energy bills with EWI (according to the Energy Saving Trust).
This system consists of three components: insulation boards (such as EPS, mineral wool or PIR), adhesive or mechanical fixings, and a protective coating such as silicone render or brick-slip cladding.
While typically installed by professionals, with correct planning, tools and care, EWI can be tackled as a DIY project.
Is DIY External Wall Insulation Worth It?
One of the first questions people ask: "Is it realistic to do myself?" The answer is yes, but it depends on a few things:
- Your DIY experience level: EWI is technically demanding, though manageable for confident DIYers.
- Your property’s size: A smaller detached or semi-detached home is more feasible than a large terraced home.
- Your access to scaffolding and tools: EWI can’t be done safely with just a ladder.
- Your time commitment: This is a multi-day (or weeks-long) project depending on your pace.
What makes DIY External Wall Insulation worth it are the significant long-term savings and the aesthetic improvement. Once you grasp the methodology and prep thoroughly, it’s highly rewarding and value-adding to your property.
Tools & Materials You’ll Need
Having the right tools and materials ready is essential to a smooth installation. Here’s a breakdown:
| Tools | Materials |
|---|---|
| Notched trowel | External insulation boards (EPS, XPS, Mineral Wool) |
| Foam gun / adhesive mixer | Base coat adhesive |
| Angle beading & mesh tape | Fibreglass mesh |
| Hammer drill & fixings | Wall plugs / mechanical fixings |
| Spirit level & string line | Silicone or acrylic render finish |
| Scaffolding (essential for upper floors) | Primer & topcoat finish |
A proper scaffold makes the job safer and quicker. You can rent it from UK scaffolding hire companies. Make sure to wear protective gear, especially when cutting or mixing materials.
Step-by-Step: How to Install External Wall Insulation
1. Prepare the Wall Surface
Before you begin, your wall must be clean, dry and free of flaking paint, algae, or dust. Any cracks or holes should be filled using external-grade filler. Remove external fixtures like downpipes, satellite dishes, and vents.
An even surface ensures strong adhesion. Use a pressure washer and antifungal wash to get rid of moss or grime. Let the surface dry completely before applying insulation.
2. Install the Starter Track
The starter track, typically made of aluminium, forms the horizontal base for your insulation boards. Install it around 150mm above ground level to avoid water splashback. Use a spirit level to make sure it’s level.
Screw it into your masonry using suitable wall plugs. This base ensures that your first row of insulation sits straight and consistent.
3. Fix the Insulation Boards
Apply the adhesive to the back of the insulation board using the "dot and dab" or full coverage method, depending on the manufacturer’s instructions. Press it firmly into place starting from the bottom up, staggering the boards brickwork-style.
Mechanical fixings (insulation fixings with plastic washers) add strength after 24 hours of adhesive curing. Always follow a consistent bonding pattern to avoid large vertical gaps.
4. Fit Beading and Reinforcement
Use corner beading for neat, strong external edges like window reveals and corners. Add expansion beads every 6 metres horizontally and vertically to avoid cracking as the wall moves.
Apply a base coat over the entire surface and embed fibreglass mesh while wet. This mesh strengthens the surface and prevents cracking from expansion or movement.
5. Render the Surface
Once the base coat has dried (usually after 24–48 hours), apply a primer followed by the finish coat. Modern silicone renders are self-cleaning, UV-resistant, and come in many colours. You can also use mineral render or even decorative brick slips for a more traditional look.
Use a stainless-steel trowel to apply the render in an even layer. Follow with a plastic float to achieve the desired texture. Work in sections to prevent visible joints or colour shading differences.
6. Reattach Fixtures and Finish Up
Once the render is dry (typically after 3–5 days), reattach fixtures like lights and downpipes using extended fixings designed for insulated walls. Use sealant to waterproof areas around windows, doors, and service pipes.
Finally, inspect your work and admire your newly insulated home!
Common Mistakes to Avoid
Avoid these typical DIY errors to ensure a professional-quality result:
- Skipping the mesh layer: This can result in cracking and structural issues down the line.
- Inconsistent coverage of adhesive: Leads to gaps and thermal bridging.
- Wrong type of insulation boards for the wall substrate: Always match insulation type to your wall type.
- Neglecting expansion joints: Large walls need movement gaps to prevent future damage.
- Poor weather planning: Rain or direct sunlight during rendering can compromise the finish.
When Should You Hire a Professional?
Some properties or situations are better suited to professional installation. If your property is more than two storeys, on a steep incline, or has complicated architectural features like bay windows and decorative cornices, consider bringing in a specialist EWI installer.
That said, many homeowners across the UK have completed EWI installations themselves – especially on garden walls, small extensions, and external garages.
Benefits of DIY External Wall Insulation
- Significantly reduced heating bills over time
- Improved home comfort and energy efficiency
- Can reduce condensation and damp problems
- Adds a modern exterior look to the property
- Increases property value and EPC rating
- Saves labour costs – a saving of thousands in many cases
Final Thoughts
External Wall Insulation is one of the most effective ways to transform the energy performance and look of your home. With the right preparation and know-how, it’s a project that is possible to DIY – especially for passionate UK homeowners and professionals looking to innovate on a budget.
Remember to plan thoroughly, invest in good materials, and always prioritise safety on-site. By following this complete guide, you’ll be well on your way to a warmer, better-looking home that saves money year after year.
Ready to give DIY EWI a go? Explore high-quality insulation materials, fixings, beadings and render systems from our online store – all supplied with UK support and fast delivery.
Trending articles
- How to Get More Insulation And ... Feb 2026
- How Much Does Insulation And Cladding ... Feb 2026
- How to Find a Reliable Insulation ... Feb 2026
- Cladding Insulation Costs UK 2026: ... Feb 2026
-
 How To Insulate and Clad Your ...
Jul 2025
How To Insulate and Clad Your ...
Jul 2025
-
How You Can DIY External Wall ...
Jul 2025