Cladding is a popular choice for enhancing a building’s appearance and improving insulation, but one crucial aspect that’s often overlooked is ventilation. Whether you're a DIY enthusiast embarking on a home project or a seasoned professional working on a large-scale build, understanding how to ventilate cladding properly is key to long-term success. In this guide, we’ll walk you through the importance of ventilated cladding systems, key components, UK regulations, and tips for achieving optimal airflow behind your façade.
Why Is Ventilating Cladding Important?
Behind every beautifully clad wall is a system designed not just for aesthetics but for durability and performance. Ventilation is a critical part of this system because it allows air to circulate behind the cladding. This airflow prevents moisture build-up, reduces the risk of rot, mould, and damp damage, and improves energy efficiency.
Without proper ventilation, trapped moisture from rain or internal condensation can cause significant damage to your structure and cladding material over time. In timber and composite cladding, this may lead to warping and decay, while in metal or cement-based options, corrosion or cracking may occur.
The UK climate—with its frequent cycles of rain followed by dry spells—makes ventilation even more essential. The goal is to create a system that allows moisture to escape as quickly as possible while providing protection from water ingress.
The Role of the Cavity in Ventilated Cladding
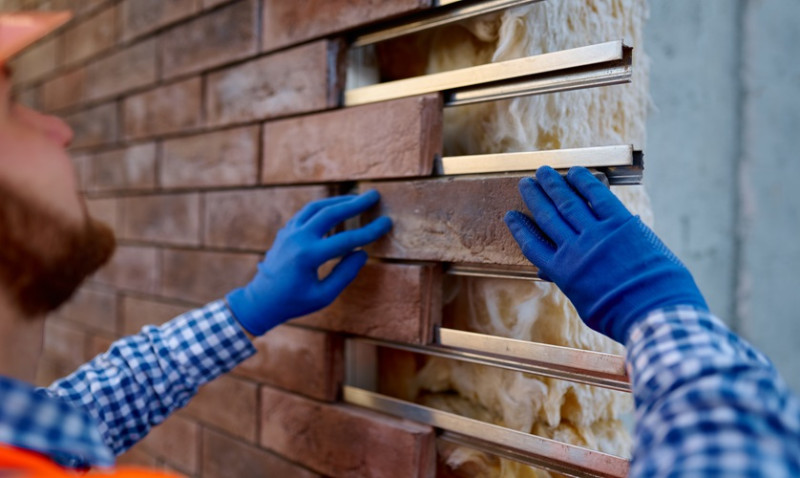
The cavity is the space between the external cladding and the internal wall or insulation layer. Installing cladding with a ventilated cavity allows both air and water to move freely, ensuring moisture doesn't become trapped and damaging materials over time.
This cavity typically ranges between 20 mm and 50 mm depending on building requirements, manufacturer guidelines, and local building regulations. A continuous air gap from bottom to top helps generate the ‘chimney effect’—warmer air rising and drawing in cooler air at the base, facilitating constant drying and preventing condensation build-up.
Having a cavity also acts as a buffer, reducing thermal bridges, improving insulation and reducing heat loss. It's vital that this cavity is not blocked by insulation or incorrectly fitted battens, which can restrict airflow and defeat the purpose of ventilation altogether.
Basic Components of a Rainscreen Ventilated Cladding System
To fully benefit from a ventilated cladding setup, you must ensure you have the essential components installed correctly. Here’s a breakdown of the typical elements used in rainscreen ventilated cladding systems:
| Component | Function |
|---|---|
| Cladding Panels | The outermost layer that provides protection and aesthetic finish. |
| Battens / Subframe | Provides structural support and creates the air cavity space. |
| Breather Membrane | Water-resistant and vapour-permeable layer that prevents moisture from penetrating the wall structure. |
| Ventilation Gaps (Top & Bottom) | Allow air to enter and exit the cavity to maintain airflow and drying. |
| Insect Mesh / Ventilation Grills | Protects airflow gaps from pests while allowing ventilation to continue. |
| Fixings / Clips | Secure cladding in place while allowing for expansion and contraction. |
Choosing quality components and adhering to manufacturer recommendations is key to the system’s long-term performance. For timber cladding, always select treated or moisture-resistant timbers suitable for outdoor conditions and compliant with British Standards (e.g. BS EN 335).
Where and How to Place Ventilation Gaps
The location and size of your ventilation gaps can make or break your cladding project’s success. Generally, ventilation should be provided at both the base and the top of the cladding system to allow continuous airflow. Side vents may also be necessary for wide facades or complex shapes.
You should aim to create a gap of at least 10 mm at the base and top of the cladding, although 25 mm is recommended for better performance. Make sure these openings are not obstructed and are protected with a mesh or vented trim to stop insects while still promoting airflow.
Ventilation at window and door openings is just as vital—ensure detailing around reveals includes drainage paths and mini cavities to avoid trapping water around these vulnerable points.
If your cladding is installed vertically, horizontal battens are used; if horizontal, vertical battens create the required airflow path. In some cases, counter battens (a crisscross of vertical and horizontal timber) are used to enable airflow regardless of cladding direction.
Best Practices for DIY Installers
If you're planning to install cladding yourself, ventilation should be at the front of your mind from the planning stage. Sketch out your system to include adequate gaps, consider battens carefully, and always leave expansion space between boards as per manufacturer guidelines especially in composite and timber products.
Check building regulations and local planning guidance if you’re working on a listed building or in a conservation area. Using breathable membranes is recommended even for small garden rooms or sheds, and always include detailing such as drip edges and bottom trims to encourage water to fall away from the structure.
If you’re unsure whether your setup provides adequate ventilation, consult with a building professional—getting it right at this stage avoids costly repairs down the line.
Complying with UK Building Regulations
In the UK, building regulations such as Approved Document B (fire safety), L (energy efficiency), and C (moisture) have requirements that relate directly and indirectly to ventilated cladding systems. For instance, a ventilated rainscreen must also provide fire stops and cavity barriers at strategic intervals, especially in residential buildings above 11 metres under the post-Grenfell regulatory environment.
Materials specified for cladding must have appropriate fire ratings and environmental resistance. Cladding systems should also undergo testing to BS 8414 to demonstrate fire performance when required.
Consult the latest regulation updates or speak with your local planning officer or building control authority to ensure your system complies. This is especially important for multi-occupancy housing, public buildings, or properties under special usage categories.
Common Mistakes to Avoid
Among the most common errors seen in cladding installation are:
- Blocking the ventilation cavity with insulation or sealants
- Not installing insect mesh or grills at ventilation points
- Using untreated or non-breathable materials in damp-prone zones
- Fixing cladding too tightly, preventing moisture and heat movement
- Failing to include drip trims or water-resisting flashings
- Ignoring fire safety regulations for cavity barriers in tall constructions
Each of these mistakes can shorten the lifespan of your cladding and reduce thermal efficiency or safety. Taking the time to plan properly and adhering to established building standards is the surest way to get a long-lasting result.
Conclusion: Build for Performance & Peace of Mind
Ventilating cladding might seem like a small detail in the bigger picture of your build or renovation project, but in reality, it’s one of the most important considerations. Whether you’re building a new garden office, cladding an extension, or working on a commercial façade, the right ventilation system is essential to a healthy, durable structure.
By understanding how to create airflow behind your cladding and the materials needed to protect your home or building, you’ll not only prevent costly problems but also contribute to thermal efficiency and building safety. It's not just about how it looks — it's about how it performs.
If you need help choosing the right cladding components or want professional support planning your system, contact our team today. We’re happy to assist homeowners, tradespeople, and designers across the UK with expert support and product insights.
Trending articles
- How to Get More Insulation And ... Feb 2026
- How Much Does Insulation And Cladding ... Feb 2026
- How to Find a Reliable Insulation ... Feb 2026
- Cladding Insulation Costs UK 2026: ... Feb 2026
-
 How To Insulate and Clad Your ...
Jul 2025
How To Insulate and Clad Your ...
Jul 2025
-
 How You Can DIY External Wall ...
Jul 2025
How You Can DIY External Wall ...
Jul 2025