
With rising energy costs and an increased focus on sustainability and thermal performance, wrapping your home in continuous insulation has become one of the smartest moves for homeowners and building professionals. Whether you’re a DIY enthusiast looking to reduce energy bills, or a professional contractor designing high-performance builds, understanding how to install continuous insulation such as Rockwool ComfortBoard is your key to success. This guide will walk you through the benefits, preparation, and step-by-step process of wrapping your home using Rockwool ComfortBoard — a modern choice for envelope insulation in the UK.
What Is Continuous Insulation (CI), and Why Should You Care?
Continuous Insulation refers to a layer of insulation that covers the entire building envelope – walls, studs, joists, and all – without thermal bridges. This method contrasts with traditional between-the-studs insulation, which often results in cold spots and energy loss due to gaps between framing members and insulation materials.
Thermal bridging (where heat transfers through the framing of your walls) is a silent energy waster. By wrapping your whole house in a blanket of insulation, you can significantly reduce those bridges, leading to higher energy efficiency.
This is particularly crucial in the UK’s damp and often unpredictable climate, where maintaining interior comfort shouldn’t come at the cost of enormous heating bills. Sustainable architecture, building regulations, and energy standards – like those adopted in Passivhaus design – also increasingly favour continuous insulation solutions.
By applying CI with materials such as Rockwool ComfortBoard, you ensure enhanced thermal resistance, increased acoustic control, improved fire safety, and superior durability compared to other insulating products.
Why Use Rockwool ComfortBoard for Continuous Insulation?
Rockwool ComfortBoard is a rigid mineral wool board made from stone wool, offering a substantial range of benefits for both renovations and new build projects. It is vapour-permeable, allowing moisture to escape from the building envelope while resisting water absorption on the exterior. This helps prevent mould and prolongs the life of external cladding systems.
Its non-combustible nature (Euroclass A1 fire rating) makes ComfortBoard especially valuable for UK homes, where fire safety regulations are tightening – particularly for multi-storey or dense housing constructions.
The product’s high R-value per inch means you can achieve excellent thermal resistance without significantly expanding your wall thickness. For London-based architects, or anyone designing in smaller lots or with thin wall profiles, this is a game-changer.
What’s more, Rockwool boards are easy to cut and install – making them highly suitable for DIYers wanting both performance and manageability during the installation process.
Key Benefits of Wrapping Your Home in Rockwool ComfortBoard
- Improved Energy Efficiency: Rockwool ComfortBoard reduces heat loss and air leakage, significantly lowering your energy bills.
- Superior Acoustic Protection: Excellent sound-absorption properties make your home quieter and more peaceful – ideal for urban UK locales.
- Moisture Management: Vapour-permeable yet water-resistant, it protects against damp and associated building damage.
- Fire Resilience: Non-combustible and heat-resistant up to 1,000°C, enhancing overall fire safety.
- Durability: Doesn’t sag, warp, or deteriorate over time like some foam-based insulations.
Materials & Tools You’ll Need
Before you get started, make sure you have the right tools and materials on hand. Here’s a quick checklist:
| Material/Tool | Details |
|---|---|
| Rockwool ComfortBoard | Choose board thickness appropriate to your desired U-value (38mm to 100mm). |
| Fasteners | Washer head screws or proprietary insulation fixings rated for masonry or timber subsurfaces. |
| Breathable Membrane | Protects insulation and functions as a weather-resistant barrier. |
| Utility Knife or Insulation Saw | To cut panels to size. |
| Level and Tape Measure | Ensure straight installation and accurate measurement. |
| Sealant or Tape | To prevent air gaps around board joints and fixings. |
Step-by-Step: How to Install Rockwool ComfortBoard as Continuous Insulation
Step 1: Prepare Your Substrate
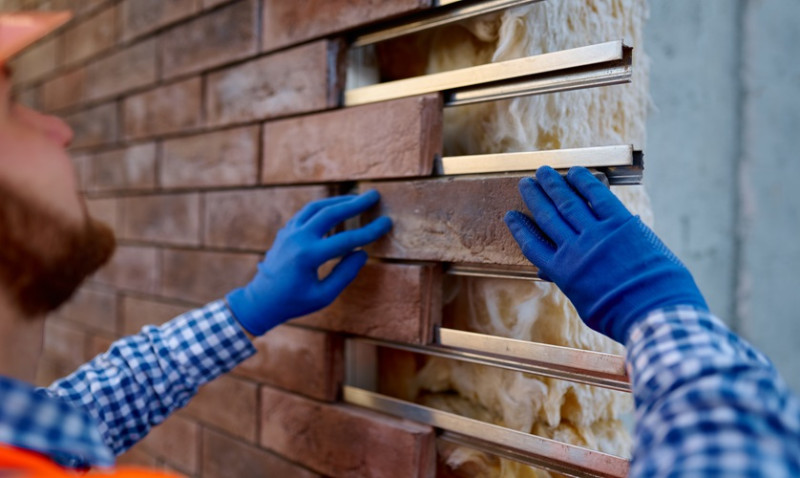
Clean and inspect the existing wall surface. If it’s brick or block, ensure the mortar is sound and there’s no significant movement or cracking. If you’re working with timber framing, make sure the sheathing is properly fastened and dry. This is essential to ensure a flat, secure base for insulation installation.
Step 2: Mark Reference Lines
Use a level and chalk line to mark horizontal guide lines to keep your rows of ComfortBoard level. Planning ahead like this will make the next steps far smoother and ensure tight seams between panels.
Step 3: Cut and Install Rockwool Panels
Using a serrated insulation saw or utility blade, cut Rockwool ComfortBoard sheets to the exact size needed. Begin at the bottom of the wall and work upwards. Fit each board snugly against its neighbour to avoid thermal bridging caused by gaps.
Secure each panel using mechanical fasteners appropriate for your wall type. Typically, you’ll want five to six fasteners per board — one in each corner and one in the middle. Use washered screws to distribute pressure and prevent the boards from deforming.
Step 4: Stagger Joints
As you install the next row of ComfortBoard, stagger the vertical joints to avoid long unbroken seams that could compromise thermal performance. Think of it like laying bricks — offsetting seams increases structural and thermal performance.
Step 5: Tape or Seal Joints
Although Rockwool itself is dense and blocks airflow, sealing around joints with vapour-open tape or Rockwool’s proprietary joint tape can enhance air tightness and reduce potential moisture ingress through small cracks or voids.
Step 6: Install a Breathable Membrane (Optional but Recommended)
To protect your CI from wind-driven rain and UV exposure before cladding is applied, install a weather-resistant barrier such as a breathable membrane. Staple or fasten this over the insulation surface, lapping seams by at least 100mm and taping edges securely.
Step 7: Apply Battens or Furring Strips
To support cladding, mechanically fix vertical battens over the insulation, aligned with structural studs or fixings behind. These create an air gap between insulation and outer cladding – promoting ventilation and allowing water to drain behind rainscreens.
Step 8: Fit Cladding
Complete your installation by attaching chosen cladding over the battens — such as timber, fibre cement, or brick slips. Your Rockwool-wrapped home is now not only energy efficient but also elegantly finished.
Final Thoughts: A Smart, Sustainable Home Upgrade
Wrapping your home in Rockwool ComfortBoard continuous insulation is one of the most impactful things you can do to increase energy efficiency, comfort, and fire resistance in your property. Although it might seem like a job best left to professionals, with proper planning and the right tools, it’s a perfectly manageable DIY project — particularly attractive for UK homeowners chasing sustainability goals and aiming to protect their home for the long haul.
Whether you're retrofitting a 1930s semi in Manchester, building a new Passivhaus cottage in the Cotswolds, or helping a client meet Part L compliance in London, Rockwool continuous insulation helps achieve top-tier performance and long-term savings — and when installed correctly, it's built to last for generations.
Ready to Get Started? Shop Rockwool ComfortBoard and professional-grade insulation fixings today — and start building a warmer, quieter, and smarter home tomorrow.
Trending articles
- How to Get More Insulation And ... Feb 2026
- How Much Does Insulation And Cladding ... Feb 2026
- How to Find a Reliable Insulation ... Feb 2026
- Cladding Insulation Costs UK 2026: ... Feb 2026
-
 How To Insulate and Clad Your ...
Jul 2025
How To Insulate and Clad Your ...
Jul 2025
-
 How You Can DIY External Wall ...
Jul 2025
How You Can DIY External Wall ...
Jul 2025