With rising energy costs and a greater push towards energy-efficient homes in the UK, external wall insulation (EWI) has become an increasingly popular solution among homeowners, architects, and tradespeople alike. Whether you’re a DIY enthusiast looking to upgrade your home’s performance, a young professional redesigning your space, or a seasoned builder seeking the best method with the highest value, understanding the full process of external wall insulation is crucial.
In this comprehensive guide, we will break down every step of the EWI process in a clear, jargon-free format. You’ll learn exactly what external wall insulation is, how it works, what materials are used, and, most importantly, how it can benefit your home in the long run. Let’s dig in.
What Is External Wall Insulation?
External Wall Insulation (EWI) is a system where insulating materials are fixed to the external walls of a property, followed by a finishing render or cladding to protect the insulation and improve aesthetics. This method significantly improves your home's thermal performance by reducing heat loss and eliminating cold bridging.
It is primarily used on solid wall properties, common in the UK’s older housing stock built before the 1920s. Unlike cavity walls, these walls have no gap between layers, so internal or external insulation methods are essential for modern thermal performance.
EWI not only dramatically reduces your heating bills but can also improve the external appearance of a dated property. Beyond aesthetics and thermal performance, it can also provide weatherproofing, sound insulation, and enhanced structural durability.
This solution is particularly ideal for properties lacking internal space to insulate from the inside—or for homeowners who want to retain the internal wall space or minimise disruption to interior décor.
Why Consider External Wall Insulation?
There are considerable benefits to installing EWI, making it an appealing choice for both homeowners and professionals:
- Energy Efficiency: Reduce heat loss by up to 45%, substantially lowering your energy bills.
- Comfort: Keep your home warmer in the winter and cooler in the summer.
- Appearance: Transform and modernise the exterior look of your property with a choice of finishes.
- Value: May increase your property value due to improved EPC rating.
- Eco-Friendly: Lower your home’s carbon emissions and environmental footprint.
Additionally, EWI is a great option if your external walls require renovation or updating, offering a two-in-one solution: insulation and redecoration.
Is Your Home Suitable for EWI?
Before starting the installation process or hiring a tradesman, you need to determine whether EWI is suitable for your property. The best candidates are:
- Solid brick or stone walls (common in older UK homes)
- Properties with minimal external architectural detailing that would be affected by insulation
- Homes not located in conservation areas or Grade-listed buildings (though permissions are sometimes still possible)
If your home is currently rendered, the condition of the surface must be assessed first. Damaged or cracked render will likely need to be removed or repaired before installation.
Planning permission may be required if your home is in a conservation area or if the new finish drastically changes your property’s appearance. Always check with your local planning department before proceeding.
Materials Used in External Wall Insulation Systems
There’s no one-size-fits-all with EWI. Choosing the right insulation type and finish depends on factors such as your building type, budget, and desired final look. Common materials include:
| Insulation Type | Description | Best For |
|---|---|---|
| Expanded Polystyrene (EPS) | Lightweight, cost-effective and great thermal performance. | Standard residential upgrades on a budget. |
| Mineral Wool | Non-combustible, breathable and offers excellent acoustic insulation. | Fire safety prioritisation and soundproofing. |
| PIR / Phenolic Board | High insulation values with thinner boards, space-saving. | Maximising performance in limited façade depth. |
Once the insulation board is fixed, a reinforcing mesh and base coat are applied over it, followed by your choice of decorative finishes: silicone render, acrylic, brick slips, or even traditional masonry cladding.
Step-by-Step: The External Wall Insulation Process
Understanding the full process helps you assess how much labour is involved, whether this is a viable DIY job, or if a professional should be hired. Here are the stages in detail:
1. Surface Preparation
The wall surface must be clean, dry, and stable. Any loose or flaking paint, old render or moss will be removed. Damaged masonry might need repairs before installation can begin.
A primer or base coat is applied in some systems to create better adhesion between wall and insulation board.
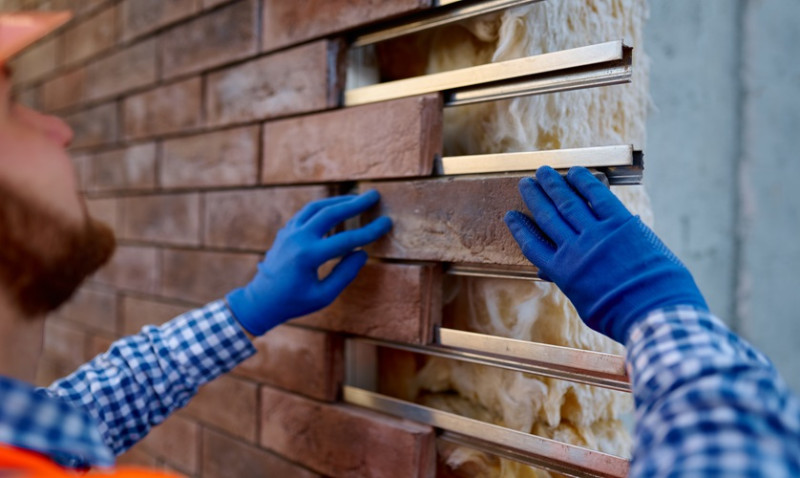
2. Fixing the Insulation Boards
Insulation boards are applied using adhesive, mechanical fixings, or a combination of both. Fixings are typically durable plastic anchors or screws designed for masonry.
Each board is laid in a staggered pattern to minimise gaps and reduce thermal bridging. Attention to detail at window reveals and doorways is crucial for performance and aesthetics.
3. Installing Reinforcement and Base Coat
A layer of basecoat render is spread over the insulation boards and a fiberglass mesh embedded into it. This adds strength, flexibility, and crack resistance to the finished surface.
This layer is allowed to cure completely. Depending on the materials used and ambient temperatures, curing can take from 24 hours to several days.
4. Decorative Finish
Once the base coat has cured, the top coat (such as silicone, acrylic or mineral render) is applied. This is your home’s new visible façade, so it's worth investing in materials with good weather resistance and a long lifespan.
Colour choices and textures are virtually limitless, allowing you to match the existing neighbourhood aesthetics or create something strikingly modern.
5. Finishing Touches
External features such as downpipes, window sills, vents, and cables are repositioned or extended to accommodate new wall thickness. Proper attention to these details ensures both function and finish remain high.
All work is quality-checked, and a silicone sealant is applied around all reveals to ensure water cannot enter behind the system.
Costs Involved in EWI Installation (UK Estimates)
The costs for external wall insulation vary depending on the size of your property, the type of insulation used, and your chosen finish. Here’s a rough estimate to help you budget:
| Type of Home | Estimated Cost (Incl. VAT & Labour) |
|---|---|
| Mid-Terrace Property | £8,000 – £12,000 |
| Semi-Detached | £12,000 – £18,000 |
| Detached Home | £18,000 – £25,000+ |
Be sure to factor in additional costs for scaffolding, waste removal, and any pre-installation repairs. Also, check if your local authority offers any grants or energy efficiency incentives for installing EWI, such as ECO4 or the Home Upgrade Grant.
Common Mistakes to Avoid
External wall insulation is a substantial investment—not just financially, but also in future performance and building health. Here are a few mistakes to steer clear of:
- Skipping Proper Surface Prep: Adhesive failures and cracking result from poorly prepared walls.
- Neglecting Damp Issues: EWI can mask rising damp; make sure any moisture problems are addressed before insulation.
- Improper Detailing: Thermal bridges at sill heads, corners, and eaves can affect insulation effectiveness and cause condensation.
- Poor Workmanship: Always choose certified installers if you’re not going the DIY route. Check for PAS 2030 accreditation.
Poor installations can lead to water ingress, cracking render, ineffective insulation, or even invalidated warranties.
Conclusion: Is EWI Right for You?
External wall insulation is one of the most powerful upgrades you can make to an older home. It delivers a sharp reduction in energy costs, enhances aesthetics, and boosts comfort. For homeowners in the UK looking to modernise and future-proof their property, it’s a smart long-term investment.
DIY-savvy individuals can tackle parts of the prep, but due to the technical nature of render systems and waterproofing, it's best to work with an experienced, certified installer for a high-quality finish.
Still doing your research? Keep an eye on your local authority’s green grants and approved installers lists—and never hesitate to get multiple quotes and references.
Thinking about installing External Wall Insulation? Reach out to us today for a consultation or advice—our EWI experts are here to guide you through every step of the process!
Trending articles
- How to Get More Insulation And ... Feb 2026
- How Much Does Insulation And Cladding ... Feb 2026
- How to Find a Reliable Insulation ... Feb 2026
- Cladding Insulation Costs UK 2026: ... Feb 2026
-
 How To Insulate and Clad Your ...
Jul 2025
How To Insulate and Clad Your ...
Jul 2025
-
 How You Can DIY External Wall ...
Jul 2025
How You Can DIY External Wall ...
Jul 2025